
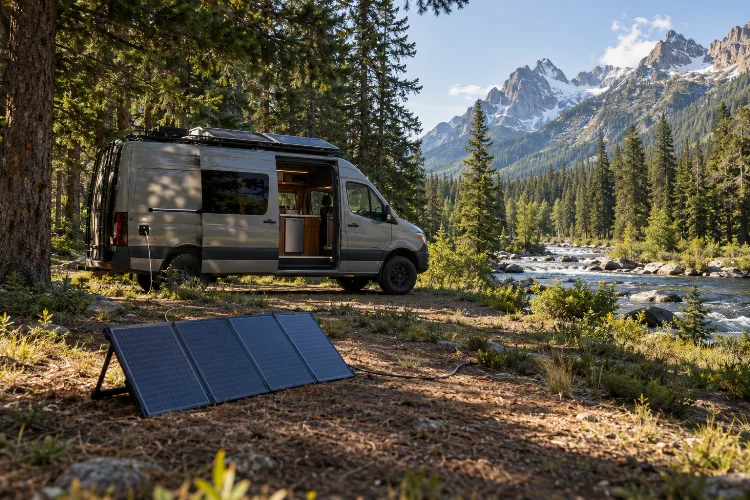
Imagine finding the perfect campsite deep in the mountains. There’s a beautiful forest, a peaceful river, and absolutely no electrical hookup for miles.
The only problem? Your campervan is parked beneath the trees, and your rooftop solar panels are barely producing any electricity.
This is where having a second solar option can completely change your off-grid experience.
Integrating portable and roof solar for remote van expeditions gives travelers more flexibility when sunlight, weather, and parking conditions aren’t cooperating. Instead of depending entirely on fixed rooftop panels, you can deploy a portable solar array wherever the sun is shining.
But combining two charging sources isn’t simply about plugging everything together. Battery compatibility, charge controllers, cable sizing, and panel positioning all influence how safely and efficiently your system operates.
A well-designed hybrid solar setup can provide dependable electricity for refrigeration, communication devices, laptops, lighting, and other essentials.
Let’s explore how these two solar solutions can work together, what equipment you’ll need, and how to build a reliable system for extended adventures away from conventional power sources.
1. Understand Why Hybrid Solar Works Better for Remote Travel
Roof-mounted solar provides everyday convenience
Rooftop solar panels are a popular choice for adventure vans because they generate electricity without requiring much daily effort.
Once securely installed, the array can collect energy whenever sufficient sunlight reaches the panels, whether you’re driving, parked at a trailhead, or relaxing at camp.
This makes fixed solar particularly useful for travelers who move frequently and don’t want to unpack equipment every morning.
A properly designed rooftop system also keeps valuable interior storage space available for food, tools, and camping supplies.
However, fixed panels have limitations.
Their orientation depends on how the vehicle is parked, and the roof may experience shading from trees, buildings, antennas, and ventilation accessories.
Flat-mounted modules also cannot easily follow the sun’s position throughout the day.
Portable solar adds flexibility
Portable solar panels solve several of these problems by allowing you to position the array independently of the vehicle.
For example, you could park your van beneath a shaded tree to keep the interior cooler while placing a folding 200-watt panel in a nearby sunny clearing.
This approach can be especially useful during summer expeditions, when direct sunlight increases cabin temperatures and refrigerator energy consumption.
Portable modules can also be repositioned as shadows move.
The trade-off is additional setup time, storage requirements, and exposure to wind, theft, or accidental damage.
Why combining both makes sense
A hybrid campervan solar system offers two complementary advantages.
The rooftop array provides convenient baseline charging, while the portable setup offers supplementary electricity when conditions are less favorable.
This doesn’t guarantee uninterrupted power, but it creates more options than relying on a single charging method.
For travelers spending several days in remote locations, that flexibility can be worth more than simply installing the largest rooftop array possible.
2. Calculate Your Power Needs Before Choosing Solar Panels
Start with realistic daily electricity consumption
Before purchasing additional panels, calculate how much energy your campervan actually consumes.
This is one of the most important steps in designing an efficient off-grid electrical system.
A compressor refrigerator, ventilation fan, LED lighting, laptop, and satellite communication device can create a considerable daily electrical load.
Let’s consider a practical example.
Suppose your refrigerator consumes approximately 400 watt-hours per day. A laptop uses 220 Wh, lighting and ventilation require 180 Wh, and smaller electronics consume another 100 Wh.
Your estimated daily energy requirement would be 900 Wh.
Of course, real consumption varies with ambient temperature, usage patterns, appliance efficiency, and operating conditions.
A fridge might consume substantially more electricity during a hot desert expedition than during a cool mountain trip.
Estimate production from both solar arrays
Imagine your campervan has 300 watts of rooftop solar and a separate 200-watt portable panel.
Together, they provide 500 watts of nominal solar capacity.
If both arrays receive three equivalent peak-sun hours and deliver an illustrative 75% overall energy yield, your daily energy production could be estimated as:
500 W × 3 hours × 0.75 = 1,125 Wh
That would theoretically cover the example 900 Wh daily requirement, leaving a modest surplus.
However, this calculation represents a simplified planning estimate, not guaranteed output.
Cloud cover, panel temperatures, shading, cable losses, and battery charging conditions all affect the actual result.
Plan for uneven sunlight
One advantage of having two arrays is that they don’t need identical exposure.
Suppose your rooftop system receives only one equivalent peak-sun hour because of tree cover, while your portable panel receives four.
Using the same illustrative efficiency factor, the rooftop system would contribute 225 Wh and the portable array approximately 600 Wh.
Combined production would be 825 Wh, below the example daily demand.
This demonstrates why battery storage and backup charging remain important even with a flexible solar system.
3. Choose the Right Rooftop and Portable Solar Equipment
Select rooftop panels based on available space
Every campervan roof has physical limitations.
Roof vents, skylights, racks, antennas, and air-conditioning units reduce the usable area for photovoltaic modules.
Measure the available space carefully before selecting panels.
High-efficiency monocrystalline modules are often attractive for compact roofs because they can deliver relatively high rated power from limited surface area.
Rigid panels generally provide robust construction and can be mounted with appropriate ventilation clearance.
Flexible panels may suit curved surfaces or weight-sensitive installations, although their temperature behavior and durability depend heavily on design and mounting methods.
Always follow the manufacturer’s requirements for roof mounting, ventilation, and structural support.
Compare folding panels and solar suitcases
Portable solar equipment comes in several configurations.
Folding panels made with lightweight materials are convenient for travelers who want equipment that can be packed into a narrow storage compartment.
Solar suitcases often feature rigid panel sections, folding legs, and protective frames.
These can be easier to position at useful angles but may be heavier and bulkier.
For example, a 200-watt portable setup might be a practical companion to a 300-watt rooftop system.
The right capacity depends on your energy needs, storage space, and how often you’ll remain stationary.
Check whether the portable kit includes a controller
This detail is frequently overlooked.
Some portable solar suitcases include a built-in charge controller, while others provide unregulated solar-panel output intended for an external controller.
These are not electrically interchangeable arrangements.
A panel with an integrated controller normally connects through a properly designed battery-side charging connection.
A controller-free panel instead needs a compatible solar charge controller between the panel and battery.
Renogy’s solar suitcase guidance describes both arrangements and emphasizes matching the equipment to the vehicle’s existing charging configuration.
Understanding this distinction before buying adapters can prevent expensive installation mistakes.
4. Connect Portable and Roof Solar Into One Charging System
Option one: Use separate charge controllers
For many expedition builds, installing a dedicated MPPT controller for each array is a practical approach.
The permanent rooftop system connects to its own controller, while the portable panels connect to a second compatible controller.
Both controllers then charge the same house battery bank through appropriately protected circuits.
This arrangement lets the arrays operate at different voltages and under different sunlight conditions without forcing them to share a single maximum-power operating point.
It also allows one array to continue operating when the other experiences heavy shading.
However, both controllers must support the battery chemistry and use compatible charging settings.
The combined charging current must remain within the battery manufacturer’s limits and the battery management system’s permitted charging capacity.
Option two: Use one appropriately sized controller
A single controller can sometimes handle both rooftop and portable panels.
This may reduce equipment costs and simplify monitoring, but panel compatibility becomes more important.
For parallel connections, panel operating voltages should be suitably matched. Series configurations introduce different current-matching concerns and may perform poorly when one array experiences much more shade than the other.
You also need to verify maximum PV input voltage, short-circuit current limits, power ratings, and applicable overcurrent protection requirements.
Simply matching panel wattage isn’t enough to guarantee compatibility.
For significantly different panels or constantly changing shade conditions, separate controllers are often the more straightforward option.
Understand portable solar connection ports
A dedicated exterior solar connection can make deploying portable panels much more convinient.
However, an exterior connector must be clearly designated for either raw photovoltaic input or regulated battery charging.
A raw PV input should feed an appropriate solar controller. A regulated controller output needs a suitable protected connection to the house battery system.
Never connect a portable kit’s regulated controller output to another controller’s PV input unless the manufacturers explicitly support that arrangement.
Also, don’t assume SAE-style solar connectors have universal polarity or internal wiring.
Verify polarity, voltage, connector ratings, and the entire cable path before plugging anything in.
Victron Energy’s MPPT installation guidance provides important information about PV voltage limits, connection procedures, and circuit protection.
5. Maximize Solar Harvesting Through Smarter Positioning
Use rooftop solar as your foundation
Rooftop panels work best when they receive unobstructed sunlight.
Unfortunately, expedition vans often carry additional equipment that creates partial shading.
Roof racks, recovery boards, ventilation housings, and cargo boxes can cast shadows across solar cells.
Even relatively small shaded sections can noticeably reduce production, depending on the module design and electrical configuration.
Consider these obstructions when planning the rooftop layout rather than treating solar installation as an afterthought.
Position portable panels for better exposure
Portable modules offer an advantage because you can move them into direct sunlight.
During the morning or late afternoon, angling a portable panel toward the sun can improve energy capture compared with leaving it flat.
The ideal orientation depends on latitude, season, time of day, and surrounding terrain.
For stationary camps, checking shadows every few hours can help identify better positions.
However, chasing perfect sunlight all day isn’t always necessary.
Sometimes moving the array once during the afternoon provides enough additional energy without interrupting your adventure.
Think about shade and cooling together
Parking beneath trees can reduce cabin temperatures, especially in warm climates.
This may lower cooling-related electricity demand while keeping passengers more comfortable.
Meanwhile, portable panels can remain in direct sunlight a safe distance away.
The U.S. Department of Energy explains that solar cell efficiency is affected by temperature, with higher temperatures generally reducing voltage and electrical output.
Providing suitable airflow beneath rigid panels and avoiding excessive heat buildup can therefore support performance.
The combination of a cooler campervan and a properly positioned remote panel may offer practical advantages over parking the entire vehicle in direct sunlight.
Account for wind and changing weather
Portable solar panels need secure positioning.
Strong winds can overturn a folding array, damage its frame, or pull on electrical cables.
Use the manufacturer’s approved supports, ground anchors, or ballast arrangements where appropriate.
Never use the electrical cable itself as a restraint.
When conditions become severe, disconnect and store portable equipment according to its operating instructions.
6. Design Battery Storage and Backup Charging for Reliability
Match battery capacity to your travel style
Solar panels produce energy when sunlight is available, but batteries provide electricity after sunset and during cloudy conditions.
For a remote expedition, the battery bank should be sized around daily demand and the expected number of days without meaningful charging.
Consider a 12.8-volt, 200-amp-hour lithium battery.
Its nominal energy capacity would be:
12.8 V × 200 Ah = 2,560 Wh
Not all of this energy should necessarily be treated as available for everyday use.
Battery management settings, operating reserves, electrical losses, and manufacturer limits reduce practical usable capacity.
For illustration, allowing a 20% reserve and another 10% for system losses leaves roughly 1,840 Wh.
Against a 900 Wh daily load, that represents approximately two days of estimated autonomy without additional charging.
Avoid charging conflicts
When multiple charge controllers feed the same battery bank, their charging profiles should be configured appropriately.
For lithium batteries, this includes checking approved charging voltages, current limits, temperature restrictions, and battery management system requirements.
Some batteries prohibit charging below certain temperatures unless suitable protection or heating is provided.
A battery monitor with a shunt can help you understand actual current flow and state of charge.
Without reliable monitoring, it’s easy to mistake a full battery limiting incoming charge current for poor solar-panel performance.
Keep alternative charging methods available
Even a well-designed hybrid array cannot guarantee enough electricity during extended bad weather.
An alternator-compatible DC-DC charger can provide another charging source while driving, provided it is correctly matched to the vehicle and house battery.
Shore charging is also useful when you occassionally visit a powered campground or service location.
These sources don’t replace solar energy, but they make the overall electrical system more resilient.
For demanding expeditions, reliability usually matters more than maximizing solar wattage alone.
7. Install, Test, and Maintain Your Hybrid Solar Setup
Design safe cable routes and connections
Portable panels frequently require longer cables than permanently mounted rooftop modules.
Longer conductors introduce resistance, increasing voltage drop and reducing energy delivered to the charge controller.
Cable sizing should account for current, total circuit length, allowable voltage drop, insulation ratings, and installation conditions.
Keep wiring away from exhaust components, sharp metal edges, moving parts, and water entry points.
Use appropriately rated outdoor connectors and weather-protected entry fittings.
Battery-side cables should have correctly sized circuit protection located according to the electrical design and equipment instructions.
The installation must also consider total charging current, not simply the capacity of each controller in isolation.
Test the system before traveling remotely
Before departing on a long expedition, check that both solar arrays operate correctly under realistic conditions.
Start by verifying individual controller operation and confirming that the battery receives the expected charging current.
Next, test both arrays operating simultaneously.
Observe battery voltage, controller temperatures, charging limits, and any abnormal fault indications.
Record daily energy production under several sunlight conditions.
A short shakedown trip can reveal cable-placement problems, insufficient battery capacity, or inconvenient panel storage before those issues become serious.
Develop a practical maintenance routine
A hybrid solar system has more components than a basic rooftop installation, so periodic inspection becomes important.
Check rooftop mounts, wiring insulation, cable entry points, and accessible electrical connections for damage.
Portable panels also need regular attention because repeated folding, unfolding, and transportation place stress on hinges and connectors.
Clean module surfaces using manufacturer-approved methods.
Dust and road grime can reduce incoming light, while damaged connectors may increase electrical resistance or create safety hazards.
Never disconnect energized PV connectors under load unless the specific equipment and procedure permit it.
Proper system isolation should be part of the installation design, not something improvised during a roadside repair.
Protect portable equipment during everyday travel
Portable arrays are useful, but they introduce additional security and storage considerations.
Avoid leaving expensive panels unattended in exposed public camping areas.
Position cables where people won’t trip over them and where vehicle tires cannot crush them.
Before driving away, make a habit of checking that all portable equipment has been disconnected, folded, and secured.
A simple deployment routine can prevent avoidable damage.
Good maintanance habits are particularly valuable when replacement components are difficult to obtain.
Combining portable and rooftop solar panels is a practical way to improve energy flexibility during remote campervan adventures.
A permanent array provides convenient everyday charging, while portable modules give you the freedom to search for better sunlight without moving the entire vehicle.
The most reliable systems begin with realistic energy calculations, compatible charge controllers, suitable battery storage, and properly protected wiring.
Careful panel positioning, performance monitoring, and regular inspections make the setup even more dependable.
Before your next overland journey, review your current electricity consumption, available rooftop capacity, and portable charging options.
Start with a balanced system that matches your travel habits, then test it under real conditions.
With thoughtful planning, your campervan can stay powered longer, travel farther, and support more unforgettable adventures beyond the electrical grid.
