
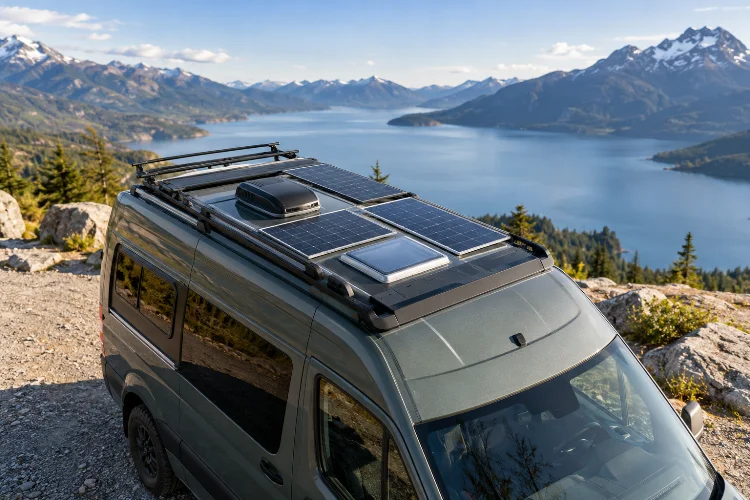
Imagine parking your campervan beside a beautiful mountain lake, switching off the engine, and enjoying a few peaceful days without worrying about finding an electrical hookup. Your fridge stays cold, your devices keep charging, and the lights work perfectly after sunset.
That’s the freedom a well-designed solar setup can provide.
Unfortunately, compact campervans don’t offer unlimited rooftop real estate. Between ventilation fans, roof racks, antennas, and skylights, there’s often barely enough room for a decent solar array.
This is where optimising solar panel performance on compact campervan roofs becomes especially important. Simply installing the biggest panels you can find doesn’t guarantee efficient electricity generation.
Panel placement, sunlight exposure, operating temperature, wiring configuration, and battery management all influence how much usable energy your system actually produces.
The good news is that smart planning can make a surprisingly big difference without requiring expensive upgrades.
In this guide, we’ll explore practical strategies for maximizing campervan solar efficiency, choosing the right equipment, reducing energy losses, and building a reliable off-grid power system that works with limited roof space.
1. Understand Your Campervan’s Available Roof Space
Measure usable space instead of total roof area
Before shopping for solar panels, take a proper look at your roof.
A compact campervan might appear to have plenty of surface area, but roof vents, air-conditioning units, roof rails, and other accessories quickly reduce the space available for solar equipment.
Start by measuring the roof’s length and width. Then identify every existing obstruction and any equipment you’re planning to install later.
Remember to account for mounting brackets, manufacturer-required clearances, cable access, and safe maintenance areas.
For example, imagine your campervan roof measures approximately 3 meters long and 1.6 meters wide. That’s 4.8 square meters of total surface area.
However, a roof fan, mounting rails, and required clearances might leave only 2.5 to 3 square meters for solar modules.
That distinction matters because choosing panels based on the full roof dimensions could leave you with equipment that simply doesn’t fit.
Create a detailed rooftop layout
Sketch a basic rooftop plan before purchasing anything. You can use design software, graph paper, or even cardboard templates to experiment with possible arrangements.
Try positioning panels around ventilation equipment while allowing for service access.
One larger module may work better than several smaller panels, particularly when it reduces mounting hardware and unnecessary wiring. However, smaller modules sometimes fit irregular spaces more effectively.
The goal is to maximize useful solar coverage without compromising ventilation, vehicle safety, or roof access.
Don’t forget to check your vehicle manufacturer’s roof-load limits and approved mounting locations. A layout that looks perfect on paper still needs to withstand highway speeds and rough-road vibrations.
2. Choose Solar Panels That Maximize Limited Space
Why panel efficiency matters
When rooftop space is limited, photovoltaic conversion efficiency becomes an important purchasing consideration.
Solar panel efficiency describes the percentage of incoming sunlight converted into electrical energy under specified testing conditions.
A panel with higher conversion efficiency can generally generate more rated power from the same surface area.
According to the U.S. Department of Energy, photovoltaic efficiency depends on several factors, including cell technology, temperature, reflection, and the characteristics of incoming sunlight.
For compact campervan roofs, high-efficiency monocrystalline modules are often worth considering.
For example, a panel operating at 22% module efficiency could theoretically deliver around 220 watts per square meter under standard test irradiance of 1,000 watts per square meter.
At 18% efficiency, the equivalent figure would be approximately 180 watts.
These are simplified comparisons, not guaranteed outdoor outputs. Real performance changes with sunlight intensity, temperature, installation conditions, and system losses.
Rigid versus flexible solar panels
Choosing between rigid and flexible solar panels can significantly influence both installation and long-term performance.
Rigid panels usually feature glass surfaces and aluminum frames. They offer good durability and can be mounted above the roof, allowing air to circulate underneath.
That ventilation is valuable because solar cells typically produce less power as their temperature increases.
Flexible modules are lighter, thinner, and better suited to gently curved roofs. They can be particularly useful on pop-top campers or vehicles where roof height and weight are critical.
However, flexible designs may experience greater heat buildup when mounted close to the vehicle surface. Their durability also varies considerably depending on construction quality and installation methods.
For long-term off-grid travel, rigid panels are often a sensible choice where space and weight allow.
For unusual roof shapes, carefully selected flexible modules may be more practical.
The best solution depends on your vehicle rather than a universal winner.
3. Reduce Shading and Improve Sunlight Exposure
Small shadows can create big problems
One of the biggest mistakes in campervan solar installations is overlooking partial shading.
You might have a 400-watt solar array, but a roof rack crossbar or ventilation housing casting a shadow across the modules can reduce actual production significantly.
Solar cells are electrically interconnected, and shaded sections can limit current through affected circuits.
Modern modules often include bypass diodes that help reduce certain shading losses, but these devices don’t magically eliminate the problem.
That’s why positioning solar modules away from rooftop obstructions is so important.
Before installing your panels, consider how shadows move throughout the day.
An object that creates almost no shade at midday may block part of a panel during the morning or late afternoon.
Consider series and parallel configurations
The wiring arrangement can also influence how your solar array responds to partial shading.
With a series connection, panel voltages add together while current remains common through the string. This arrangement can reduce cable losses for a given power output, but mismatched or shaded modules can constrain string performance.
With a parallel connection, panel currents add while operating voltage remains similar. Separately connected modules may be less affected by shading on another module, depending on their electrical characteristics and the controller.
Neither arrangement is automatically better in every situation.
For a compact campervan with roof vents casting occasional shadows, parallel wiring or separate MPPT controllers may offer advantages.
However, electrical compatibility, controller limits, wiring protection, and actual shading conditions should determine the final configuration.
Park strategically whenever possible
Sometimes, the most effective solar upgrade costs absolutely nothing.
Parking in an open location with good sun exposure can produce more useful energy than installing another small panel in a shaded position.
Of course, there’s an obvious compromise during summer. Parking in direct sunlight increases interior temperatures, potentially making your ventilation fan and refrigerator work harder.
A useful alternative is pairing roof-mounted modules with a portable solar panel.
You can park the campervan in the shade while positioning the portable module in a sunny area nearby, provided the installation is secured and electrically compatible.
4. Manage Heat to Protect Solar Panel Performance
Why hotter panels aren’t always better
It sounds strange, but solar panels generally perform better electrically when their cells are cooler.
Sunlight is essential for generating electricity, yet the same sunlight also heats the panel.
As cell temperature rises, voltage typically decreases, reducing the maximum available power.
For illustration, consider a module with a power temperature coefficient of -0.35% per degree Celsius.
If its cell temperature increases from the standard 25°C testing temperature to 55°C, the temperature-related power reduction would be approximately 10.5%.
A nominal 200-watt module could therefore produce around 179 watts under otherwise equivalent standard irradiance conditions, before additional electrical losses.
Actual results depend on the specific module and operating environment.
Allow appropriate airflow beneath panels
Rigid solar panels mounted with suitable clearance above the campervan roof can benefit from air circulation.
This helps dissipate heat instead of trapping it between the module and the vehicle body.
Follow the panel manufacturer’s mounting and ventilation requirements rather than assuming one universal gap works for every installation.
For flexible modules, pay particular attention to the approved mounting surface and thermal management instructions.
Some products permit direct bonding, while others require specific backing materials or mounting arrangements.
Improvising adhesive methods can create overheating, water damage, or panel-detachment risks.
Think about roof accessories and airflow
Bulky roof accessories may influence both shading and airflow.
A badly positioned storage box can block sunlight during critical hours, while unnecessary rooftop equipment may complicate solar mounting.
Keep the layout simple and avoid mounting accessories that interfere with panel ventilation.
This can improve operating effeciency while keeping the roof easier to inspect and maintain.
5. Use Efficient Charge Controllers and Proper Wiring
Why an MPPT controller matters
Solar panels generate electricity at voltage and current levels that vary throughout the day.
A solar charge controller manages energy transfer from the array into your campervan battery system.
For compact installations where every watt matters, a Maximum Power Point Tracking (MPPT) controller is often a worthwhile investment.
Unlike basic Pulse Width Modulation (PWM) controllers, MPPT devices adjust their operating point to harvest power more effectively from the solar array.
This can improve overall energy collection, particularly when panel operating voltage differs substantially from battery charging voltage.
However, the advantage depends on the actual equipment and conditions.
Match controller specifications carefully
A bigger controller isn’t automatically a better controller.
Choose equipment based on your battery voltage, array power, maximum open-circuit voltage, and expected charging current.
Remember that solar panel open-circuit voltage increases in colder conditions. Series-connected modules must remain below the controller’s voltage limit even at the coldest anticipated temperature.
Manufacturers such as Victron Energy provide detailed specifications and installation instructions to help users match equipment correctly.
Using an undersized or incompatible controller can limit charging performance or damage components.
Reduce unnecessary electrical losses
Even an excellent solar panel can deliver disappointing results if its wiring is poorly designed.
Long cable runs, undersized conductors, loose terminals, and corroded connections increase electrical resistance.
This creates voltage drop and wastes energy that could otherwise reach your batteries.
Plan the shortest practical cable route, use correctly sized solar-rated conductors, and protect wiring from sharp edges, moisture, and movement.
Select connectors, fuses, disconnects, and circuit protection according to the actual electrical design and applicable standards.
Never treat electrical safety as an optional upgrade.
If you’re unfamiliar with DC electrical installations, have a qualified professional design or inspect the system before use.
6. Match Solar Generation With Real Energy Consumption
Calculate daily power requirements first
One of the most common campervan solar mistakes is choosing panel capacity before understanding electricity consumption.
Start by listing the appliances you expect to use every day.
A compact refrigerator, ventilation fan, laptop, water pump, and LED lighting might appear relatively modest individually. Combined, their energy demand can become substantial.
Consider this example:
A refrigerator averages 400 watt-hours per day. Lighting and ventilation consume 150 Wh, a laptop uses 180 Wh, and smaller electronics require another 120 Wh.
That’s a total daily requirement of approximately 850 Wh.
Now imagine installing two 200-watt panels, giving you a nominal 400-watt array.
With 3.5 equivalent peak-sun hours and an illustrative overall energy yield factor of 75%, the estimated daily production would be:
400 W × 3.5 hours × 0.75 = 1,050 Wh
That suggests the array could cover the example demand under those conditions.
However, 1,050 Wh is a planning estimate, not a guaranteed daily result. Weather, shading, season, panel temperature, and charging limitations can all reduce output.
Tools such as NREL’s PVWatts can help explore solar-resource estimates, although its grid-connected, fixed-array assumptions need adjustment when planning a mobile campervan system.
Size your battery bank intelligently
Solar panels collect energy, but batteries make that electricity available when sunlight disappears.
For example, a nominal 12.8-volt, 100-amp-hour lithium battery stores approximately 1,280 Wh.
A 200-amp-hour version stores roughly 2,560 Wh.
Usable energy depends on battery specifications, operating limits, temperature, and conversion losses.
With an estimated 850 Wh daily demand, a 200 Ah battery provides a useful buffer during cloudy conditions.
However, it doesn’t guarantee three full days of operation without charging.
Reduce consumption before expanding the array
Increasing solar capacity isn’t always the cheapest way to improve off-grid autonomy.
A more efficient refrigerator, LED lighting, reduced inverter standby time, or better insulation may reduce energy demand considerably.
For example, eliminating 150 Wh of unnecessary daily consumption saves 1,050 Wh over a week.
That’s energy you no longer need to generate or store.
When every centimeter of roof matters, smart energy management can be just as valuable as installing high-output photovoltaic modules.
7. Maintain, Monitor, and Test Your Rooftop Solar System
Keep panels clean without damaging them
Dust, pollen, bird droppings, and road grime can interfere with sunlight reaching photovoltaic cells.
This is particularly relevant for campervans traveling through dry landscapes, coastal areas, or construction zones.
Inspect the panels regularly and clean them according to the manufacturer’s recommendations.
A soft cloth, suitable water, and gentle cleaning methods are usually preferable to abrasive tools or harsh chemicals.
Avoid walking on modules unless the manufacturer explicitly permits it.
Also, never attempt roof maintanance without safe access equipment and appropriate precautions.
Monitor actual solar production
An MPPT controller with energy monitoring can help you understand how the system performs in everyday conditions.
Instead of relying entirely on theoretical wattage, observe charging power, daily energy harvest, battery state of charge, and changes caused by parking locations.
Try comparing performance on clear days with similar sunlight conditions.
If production suddenly decreases, check for shadows, dirt, loose connections, controller restrictions, or changes in battery charging demand.
Remember that a nearly full battery may accept less charging power even when sunlight is excellent.
Low charging wattage doesn’t automatically mean something is wrong with the solar panels.
Inspect mounting hardware and connections
Campervans experience continuous vibration, temperature changes, and exposure to rain and wind.
Over time, mounting brackets, cable glands, and electrical connections can develop problems.
Inspect accessible components periodically, especially after long journeys on rough roads.
Look for damaged insulation, water intrusion, loose hardware, unusual heat discoloration, and worn mounting components.
Never disconnect solar connectors under load unless the equipment is specifically rated and procedures allow it.
If you notice electrical damage or overheating, isolate the system using its designed disconnect procedure and arrange a professional inspection.
Learn from real travel conditions
A solar installation that works perfectly in your driveway may behave differently during extended travel.
Mountain shadows, tropical rain, winter daylight, and desert heat all influence generation.
Record daily energy production during different trips so you can identify realistic performance patterns.
These measurments help you decide whether your setup needs more panel capacity, additional battery storage, a supplementary charging source, or simply better parking habits.
Optimising solar panel performance on compact campervan roofs isn’t just about squeezing more panels into a limited space. It’s about designing a complete energy system that works efficiently under real travel conditions.
Thoughtful panel placement, high-efficiency modules, reduced shading, proper ventilation, and well-matched charge controllers can all improve solar harvesting.
Combining these decisions with sensible battery capacity, efficient appliances, and regular maintenance creates a more dependable off-grid setup.
Most importantly, remember that every campervan has different space limitations and energy requirements.
Before upgrading your system, measure your roof, calculate daily electricity consumption, and review your existing equipment.
With careful planning, even a compact campervan can deliver impressive solar independence, giving you more time to explore and less time searching for the next electrical hookup.
