
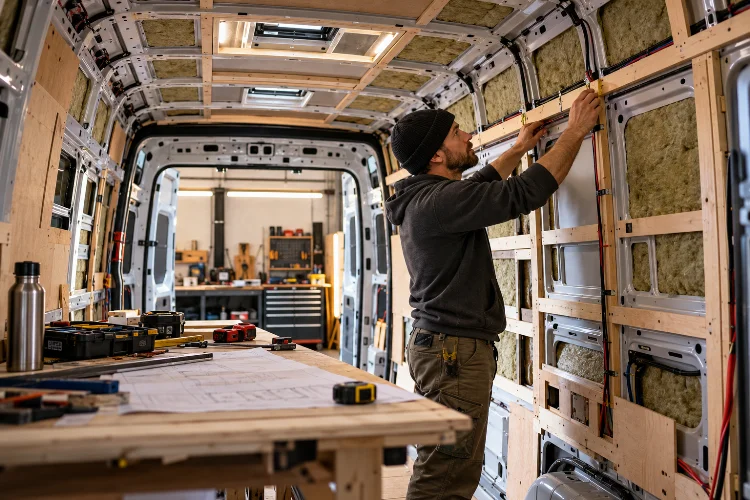
Turning an ordinary cargo van into an adventure-ready home on wheels sounds like the ultimate DIY dream. You’ve probably seen those incredible campervan transformations featuring cozy sleeping areas, stylish kitchens, and clever storage systems.
But behind every successful conversion is something far less glamorous and much more important: solid structural planning.
Building a custom adventure van isn’t just about fitting furniture into a small space. You’re creating a moving environment that must handle road vibrations, changing weather conditions, heavy equipment, and thousands of miles of travel.
That’s why structural planning for custom adventure van conversion projects deserves serious attention before the first cabinet gets installed.
From understanding vehicle load limits to selecting mounting points and choosing lightweight materials, every decision influences safety, durability, and comfort.
The good news? You don’t need to be a professional automotive engineer to understand the fundamentals.
This guide breaks down the most important structural considerations into practical, easy-to-follow concepts. Whether you’re planning a weekend camper or a serious off-grid exploration vehicle, you’ll learn how to build a stronger foundation for your adventure.
1. Understanding the Structural Foundation of an Adventure Van
Before designing your interior, it’s important to understand what makes a commercial van structurally different from a traditional house.
A vehicle constantly experiences forces from acceleration, braking, cornering, and uneven roads. Its body also flexes slightly during normal operation, especially when driving over challenging terrain.
These movements influence how interior components should be designed and attached.
Understanding the Vehicle’s Existing Structure
Most popular adventure van platforms, including the Ford Transit, Mercedes-Benz Sprinter, and Ram ProMaster, use vehicle-specific body structures.
These typically include reinforced floor sections, structural pillars, roof supports, and factory-designed attachment locations.
Each component contributes to the vehicle’s overall performance.
One common mistake is assuming every visible metal surface can safely support heavy furniture or equipment.
In reality, thin body panels and structural reinforcements serve different purposes.
Before installing cabinets or making modifications, study the manufacturer’s body-building guidelines. These documents identify important restrictions, recommended mounting practices, and areas requiring special attention.
Planning Around Structural Limitations
Every vehicle has physical boundaries that influence conversion possibilities.
Wheel wells reduce usable floor width, while roof support members can complicate ventilation fan installations.
The sliding door opening also affects where cabinetry and interior partitions can be placed.
Rather than fighting these constraints, incorporate them into your design.
For example, building a storage compartment around a wheel arch can make use of an otherwise awkward area.
Likewise, positioning overhead cabinets around approved attachment points can reduce unnecessary modifications.
A great adventure van layout works with the existing vehicle structure instead of weakening it.
2. Creating a Structural Layout Before Construction Begins
One of the smartest things you can do is create a detailed layout before buying expensive materials.
It’s tempting to start cutting plywood immediately, especially when you’ve already collected dozens of inspiring campervan photos.
However, planning first can save significant time, money, and frustration.
Measuring the Interior Accurately
Start with the van’s actual interior dimensions.
Measure floor length, wall curvature, roof height, door openings, and the distance between structural supports.
Don’t assume the manufacturer’s published cargo dimensions describe every part of the interior accurately enough for custom cabinetry.
Curved walls and irregular surfaces can create unexpected installation challenges.
A simple cardboard template often works better than guessing complicated shapes.
For more advanced projects, three-dimensional modeling software can help you visualize the interior and identify potential conflicts.
Tools such as SketchUp or Fusion can be useful for exploring furniture dimensions and assembly arrangements.
Even a basic digital model becomes valuable when coordinating several components.
Keep a record of your measurments so future modifications don’t require repeating the entire process.
Designing Functional Interior Zones
Think about your campervan as a collection of functional spaces.
You’ll probably need areas for sleeping, cooking, storage, electrical equipment, and movement.
The trick is making these zones work together without overcrowding the vehicle.
For instance, positioning a fixed bed toward the rear can create room beneath it for bicycles and camping equipment.
A kitchen near the sliding door may improve ventilation and provide convenient access from outside.
Meanwhile, electrical components can be grouped in a protected compartment that remains accessible for maintenance.
Try walking through the layout mentally.
Can you reach the refrigerator when the bed is extended? Will cabinet doors open without hitting nearby furniture? Can someone exit quickly during an emergency?
These questions might sound simple, but solving them during planning is much easier than correcting them after construction.
3. Calculating Vehicle Weight and Distributing Loads Correctly
Weight management is one of the most important aspects of adventure van engineering.
A conversion might look perfectly balanced from the outside while placing excessive loads on the suspension or rear axle.
That’s why weight calculations should happen before major components are installed.
Understanding Payload Capacity
Every van has a Gross Vehicle Weight Rating, commonly called GVWR.
This represents the manufacturer’s maximum permitted loaded vehicle weight.
Payload is generally calculated by subtracting the vehicle’s actual operating weight from its GVWR.
Let’s imagine a hypothetical van with a GVWR of 3,500 kilograms.
If the empty vehicle weighs 2,650 kilograms in its measured condition, that leaves approximately 850 kilograms before reaching the total weight limit.
Now consider the additional loads:
| Component | Estimated Weight |
|---|---|
| Interior Furniture | 220 kg |
| Electrical Equipment | 80 kg |
| Water and Plumbing | 100 kg |
| Two Occupants | 150 kg |
| Adventure Equipment | 120 kg |
| Total Added Weight | 670 kg |
In this simplified example, the vehicle retains approximately 180 kilograms of total weight capacity.
However, these numbers are only illustrative. Actual calculations must account for the vehicle’s measured starting condition, fuel, equipment, and manufacturer specifications without double-counting items.
More importantly, staying below GVWR doesn’t automatically mean the conversion is safe.
Managing Axle Loads and Center of Gravity
Each axle has its own load rating, usually described as Gross Axle Weight Rating (GAWR).
A rear-heavy conversion can exceed the rear axle limit even when the total vehicle weight remains acceptable.
This becomes particularly relevant when storing motorcycles, e-bikes, or heavy recovery equipment behind the rear axle.
Loads positioned behind an axle can create a leverage effect, increasing the load on that axle while reducing the load on the other.
Heavy equipment should generally be installed low and positioned to maintain suitable axle loading.
Water tanks, batteries, and dense storage compartments deserve careful consideration.
For reliable results, weigh the finished vehicle at an appropriate scale, including individual axle loads, with the equipment and supplies you normally carry.
A well-balanced vehicle is more likely to maintain predictable handling characteristics during demanding travel conditions.
4. Engineering Secure Mounting Points and Interior Frameworks
A beautiful cabinet isn’t particularly useful if it becomes loose after a few hundred miles of rough-road driving.
Secure mounting systems are essential because furniture inside a moving vehicle experiences forces that ordinary household furniture isn’t designed to withstand.
This is where careful structural engineering becomes especially valuable.
Choosing Reliable Attachment Methods
Builders often use mechanical fasteners, factory mounting locations, aluminum framing, and compatible rail systems to secure interior components.
Threaded inserts and manufacturer-approved mounting locations may provide useful attachment options when their load capacities are appropriate.
Aluminum T-slot extrusion systems are also popular for modular interiors.
These profiles allow components to connect through standardized brackets and mechanical fasteners.
Their biggest advantage is adaptability. You can modify cabinet dimensions or rearrange equipment without rebuilding the entire framework.
However, an aluminum frame is only as reliable as its connections.
Fastener selection, joint design, load direction, and attachment to the vehicle all influence the final result.
Heavy equipment should never rely on ordinary decorative panels or unverified attachment points.
Understanding Dynamic Loads
Imagine a storage cabinet weighing 30 kilograms.
While parked, its mounting system supports the cabinet’s static weight.
During sudden braking or a collision, the forces acting on that cabinet can become substantially greater.
That difference explains why automotive equipment requires more careful restraint than household furniture.
Builders must consider expected driving loads and applicable crash-safety requirements.
Where necessary, qualified professionals should assess critical attachments and use suitable, tested components.
Adhesives can also contribute to certain assemblies, but not every bonding product is appropriate for structural applications.
Always follow the adhesive manufacturer’s instructions and the vehicle manufacturer’s restrictions.
Proper preparation, compatible materials, and curing conditions are essential for reliable bonds.
Most importantly, don’t treat an untested adhesive connection as a replacement for a required structural mounting system.
5. Choosing Structural Materials for Strength and Efficiency
Material selection can dramatically influence the overall quality of a van conversion.
The challenge is finding materials that offer enough strength without adding unnecessary weight.
Fortunately, modern campervan construction provides several practical options.
Comparing Wood, Aluminum, and Composite Panels
Plywood remains one of the most widely used materials in custom van interiors.
It’s relatively affordable, easy to machine, and suitable for many cabinetry applications when correctly specified.
High-quality plywood can provide durable furniture construction, although its weight varies according to thickness and composition.
Aluminum offers another attractive solution.
It’s particularly useful for adjustable frameworks, equipment supports, and removable furniture assemblies.
Composite sandwich panels may offer a high stiffness-to-weight ratio, depending on their core and face materials.
However, they can require specialized connection methods because fasteners may perform differently from those installed in solid wood.
No single material is perfect for every application.
A practical conversion might combine aluminum framework sections, plywood cabinets, and lightweight decorative panels.
This hybrid approach helps balance construction cost, durability, and vehicle weight.
Designing Stronger Joints and Connections
The strength of a furniture assembly depends on more than the materials themselves.
Joint geometry, fastener placement, and load distribution all affect performance.
For example, a large overhead cabinet might benefit from multiple properly engineered mounting locations that distribute forces across suitable supporting structures.
A cabinet attached through only a few poorly positioned screws can fail even when its panels appear extremely sturdy.
For wooden assemblies, appropriate corner reinforcement and well-designed mechanical connections can improve durability.
It’s also important to account for vibration and temperature-related movement.
Automotive environments are demanding, and materials may expand or contract differently.
Allowing appropriate movement where necessary can reduce squeaks, cracked finishes, and premature joint wear.
The goal is a strong but practial construction system that remains reliable throughout years of travel.
6. Planning Floors, Roof Modifications, and Utility Installations
Structural planning doesn’t stop with furniture and cabinetry.
Floor systems, roof-mounted accessories, ventilation openings, and utility installations can all affect the vehicle’s durability.
These areas deserve attention early in the conversion process.
Building a Durable Campervan Floor
The floor provides the foundation for much of the interior.
A typical campervan floor may include insulation, plywood underlayment, and a durable finishing material.
Each layer serves a different purpose.
Insulation improves thermal comfort, while the underlayment creates a more even surface and helps distribute local loads.
The finishing layer protects the interior from wear and moisture.
However, it’s important to distinguish between a floor that supports everyday use and a structural anchor capable of restraining heavy furniture during a collision.
A plywood subfloor does not automatically provide an adequate attachment to the vehicle.
Heavy components may require dedicated mounting arrangements connected to approved structural locations.
Waterproofing also matters.
Moisture trapped beneath flooring can encourage corrosion and become difficult to detect.
Proper sealing, corrosion protection, and accessible inspection areas make long-term maintenance easier.
Protecting the Roof Structure
Adventure vans often carry roof racks, solar panels, ventilation fans, and sometimes rooftop tents.
These accessories introduce additional weight and mounting requirements.
Before cutting roof openings or installing equipment, identify factory roof supports and approved attachment areas.
Avoid cutting structural roof members without specific manufacturer authorization and a suitable engineered solution.
Remember that roof load ratings can vary by vehicle model, configuration, mounting method, and driving conditions.
A roof accessory also raises the vehicle’s center of gravity, which may influence handling.
For solar panels and ventilation equipment, coordinate the installation layout before making openings.
This prevents unnecessary interference between accessories and helps preserve access for maintenance.
Coordinating Utility Routes
Electrical wiring and plumbing should follow planned paths that avoid unnecessary damage to the vehicle.
Use appropriate protection when routing cables through metal openings.
Water lines should be positioned where leaks can be identified and repaired without dismantling major furniture structures.
Maintain separation from hot exhaust components, moving mechanisms, and other potential hazards.
A little extra planning here can prevent complicated repairs during future trips.
7. Testing, Safety Validation, and Future-Proofing the Conversion
Even a carefully designed campervan needs real-world validation.
A structure that feels solid in the driveway might behave differently after hours of driving on gravel roads.
That’s why testing should be treated as an essential part of the conversion rather than an optional finishing step.
Performing Structural Inspections
Begin by checking the installation quality of every major component.
Inspect accessible fasteners, brackets, furniture joints, and mounting rails.
Look for movement, visible deformation, unusual contact points, and signs of looseness.
During initial driving tests, pay attention to new rattles, squeaks, or shifting equipment.
These symptoms don’t necessarily indicate serious damage, but they deserve investigation.
After driving on uneven terrain, repeat the inspection.
Pay particular attention to heavily loaded storage areas and equipment mounted above occupant spaces.
Never intentionally test restraint strength through dangerous braking maneuvers.
Critical components should be evaluated using appropriate engineering methods and applicable safety standards.
Planning for Long-Term Adaptability
Travel requirements rarely stay the same forever.
You might begin with weekend camping trips and eventually transition into extended overland expeditions.
Designing adaptable storage and furniture can make those changes considerably easier.
For example, removable gear compartments allow you to switch between mountain biking, hiking, and general travel equipment.
Standardized mounting hardware can also simplify upgrades.
You may eventually replace a compact battery system, install different storage modules, or reorganize the sleeping area.
Keeping essential equipment accessible makes these modifications less disruptive.
A maintainance-friendly layout also helps when inspecting electrical connections, plumbing fittings, and corrosion-prone locations.
Understanding Safety and Legal Requirements
Vehicle modification rules vary between countries and jurisdictions.
Changes involving additional passenger seats, seat belts, structural body members, and vehicle classifications may require specialized approvals or inspections.
For example, installing a bench for campsite seating doesn’t automatically make it suitable for carrying passengers while driving.
Passenger seating and restraint systems must comply with relevant requirements.
Similarly, vehicle modifications should not disable factory safety equipment such as airbags or interfere with critical vehicle systems.
Consult the appropriate vehicle manufacturer, inspection authority, or qualified automotive engineer when planning safety-critical changes.
A successful adventure van conversion should deliver freedom without creating avoidable risks.
Structural planning for custom adventure van conversion projects is the foundation of a safe, comfortable, and long-lasting mobile adventure setup.
By understanding the vehicle’s existing structure, calculating payload, distributing weight correctly, and choosing reliable mounting systems, you can avoid many of the common mistakes associated with DIY conversions.
Material selection, floor construction, roof modifications, and utility placement also play important roles in overall durability.
The smartest approach is to plan carefully, document your decisions, and test the finished conversion before heading into remote destinations.
Remember, a well-engineered adventure van isn’t necessarily the most complicated or expensive build. It’s the one that works reliably for your specific travel needs.
Ready to begin your adventure van conversion? Start with accurate measurements, a realistic weight budget, and a structural layout that prioritizes safety, flexibility, and long-term performance.
