
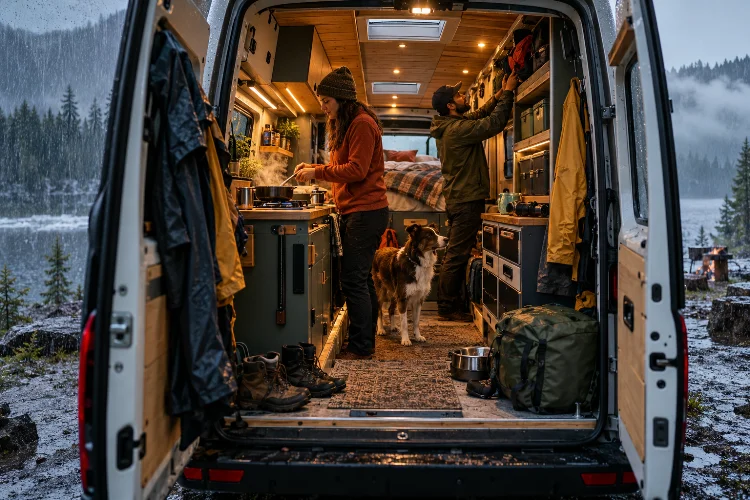
Picture this: you’re three weeks into an overland trip, it’s raining sideways, and your hiking boots are soaked. Your partner wants to cook dinner, the dog is blocking the aisle, and the tool you need is buried beneath six storage bins.
Extended overland travel asks more of a vehicle than a weekend road trip. Your van needs to be a bedroom, kitchen, workshop, storage locker, and reliable base camp, often without a campground hookup in sight.
Every centimeter has a job, and every extra kilogram comes along for the ride. That’s why advanced adventure van layout design for extended overland travel starts with how you actually live, not which cabinets look coolest.
A smart floor plan balances movement, weight, comfort, safety, and the ability to fix things when you’re miles from a service center.
Whether you’re converting a Sprinter, Transit, or another capable platform, this guide will help you create an overland camper interior that stays practical long after the novelty wears off. Let’s get into the decisions that make the biggest difference.
1. Design Around Your Travel Mission First
Define your real-world routine
Before drawing a floor plan, get specific about the trips you plan to take. Are you crossing hot, dusty regions, driving mountain passes, or spending months in places where water and fuel stops are unpredictable? These scenarios demand different compromises.
A climber carrying ropes and muddy gear needs a different adventure van layout than a remote worker who spends six hours a day on video calls.
A couple traveling with a dog may value an open walkway more than a private shower. There’s no universal best layout, only a layout that fits your routine.
Write down what happens during a normal day, from the moment you wake up until bedtime. Consider where you’ll change clothes, dry wet jackets, recharge devices, prepare meals, and reach a first-aid kit.
Prioritize by frequency, not fantasy
Give the easiest access to items you use several times a day. Your water tap, fridge, daily clothing, and charging ports should never require moving camping chairs or opening the rear doors in a storm.
Meanwhile, recovery boards, spare parts, and bulky seasonal gear can live in more specialized compartments, provided emergency equipment remains quickly accessible. This simple priority system prevents storage from turning into an endless puzzle.
It’s tempting to build for every possible adventure. But adding a giant shower, oversized kitchen, and full bike workshop often leaves almost nowhere to move. Design for your most common travel days first, then accomodate rare activities with removable equipment.
2. Choose the Right Platform and Sleeping Layout
Understand the space you’re actually buying
Long-wheelbase vans offer more interior room, but extra length can make tight switchbacks, ferry bookings, parking, and narrow tracks more complicated. Shorter vans are easier to maneuver but force tougher choices about storage, bed dimensions, and bathrooms.
Measure the interior after accounting for insulation, wall panels, wheel arches, and the way the body narrows toward the roof. An advertised vehicle dimension is not the same as usable sleeping width. If you’re tall, test whether a crosswise bed really lets you stretch out.
Also think about roof height. Standing space feels wonderful when cooking for months, but a taller vehicle may encounter height restrictions and more wind exposure.
Fixed bed, convertible bed, or lift bed?
A raised fixed bed at the rear is a favorite for expedition-style camper van conversions. It stays ready all day and creates a garage below for bikes, tools, water equipment, or dirty outdoor gear. The trade-off is reduced sitting headroom on the mattress and less flexible living space.
A convertible dinette opens the cabin during daylight hours. It’s appealing for compact builds, but converting the bed every night gets old fast when bedding is damp or you’re exhausted after a long drive.
A lift bed provides flexibility, raising the mattress when you need cargo space. Just remember that rails, motors, and moving parts introduce weight and potential maintenance.
For two long-term travelers, a fixed rear bed, side galley, and compact front seating area is a strong baseline. It’s not flashy, but it offers predictable circulation and fewer daily chores.
3. Divide the Interior Into Hardworking Zones
Create a clean flow from cab to cargo
Think of your camper as three connected zones: a forward lounge or workspace, a middle cooking and utility area, and a rear sleeping and gear section.
Swivel cab seats can turn otherwise-unused driving space into a dining nook or laptop station. A folding table gives you a proper work surface without permanently swallowing the aisle.
The kitchen usually works best close to the sliding door, where there’s daylight, fresh air, and convenient outdoor access. Keep the fridge reachable when the bed is occupied, and test whether cupboard doors collide with people standing at the counter.
Make the dirty-gear transition painless
Overland trips involve mud, sand, rain, and equipment that you definitely don’t want on your pillow. Give boots, wet jackets, and recovery gear a dedicated landing zone near a door.
A shallow boot tray, wipe-clean floor, removable mat, and washable wall finish can do more for daily comfort than luxury upholstery. Add hooks where wet items can drain or dry without touching electrical gear or bedding.
If bikes or bulky sports equipment travel inside, use dedicated tie-down points and a loading path that doesn’t require dismantling the whole kitchen.
Use furniture that earns its space
The cleverest small-camper designs make individual components handle two or three tasks. A bench can store supplies, a flip-up counter can increase prep space, and a removable table can become an outdoor workstation. Still, avoid turning every surface into a complicated transformer.
4. Keep Storage Accessible and Weight Under Control
Heavy items belong low and secure
An impressive storage garage is useless if it makes the van unpleasant or unsafe to drive. Water tanks, batteries, tools, and heavy spares should generally sit low and as close to the axle area as the chassis and layout allow, rather than piled high at the rear.
Check the vehicle’s gross vehicle weight rating (GVWR) and front and rear gross axle weight ratings (GAWR). The total weight can be under the legal maximum while one axle is still overloaded.
Actual axle-scale readings with passengers, fuel, water, and gear aboard are more useful than estimates. For perspective, 70 liters of water weighs roughly 70 kilograms before the tank and plumbing are counted.
Design storage by access level
Separate frequently used supplies from long-term spares. Daily cooking gear belongs in drawers that open from inside. Recovery equipment should be secured but immediately available from the appropriate door, even when the garage is packed.
Use dividers and positive-locking drawer hardware that can handle corrugated tracks. Tall cupboards need proper structural attachment, not just decorative screws into thin paneling.
One underrated feature is a small maintenance hatch. If you can reach a fuse, pipe fitting, or tank sensor without removing a cabinet, roadside repairs become far less stressful. That kind of maintainence access is worth planning before the walls go on.
5. Engineer Water, Power, and Cooking for Off-Grid Living
Calculate water autonomy before choosing a tank
A water tank should match how you travel, not simply fill the largest available cavity. Start with a realistic daily allowance for drinking, cooking, dishwashing, and basic cleaning, then adjust for showers and climate.
As an example, two people using seven liters each per day need about 14 liters daily. A 70-liter supply lasts five days on paper, but reserving 20% for unexpected delays brings practical planning closer to four days.
Position fresh water where temperature extremes won’t easily freeze it or overheat it. Include an accessible filter, drain, shutoff valve, and a separate route for grey water.
Even a simple outdoor shower should be designed around where wastewater will go; never assume dumping it on the ground is permitted.
Size the electrical system from daily loads
Start with a list of devices and estimate their energy demand in watt-hours. Imagine a fridge using 450 Wh per day, laptops requiring 160 Wh, ventilation and lighting using 140 Wh, and pumps plus small electronics adding 150 Wh. That’s approximately 900 Wh per day.
A nominal 12.8-volt, 200-amp-hour lithium battery stores about 2,560 Wh before practical losses, manufacturer limits, and reserve margins. That makes it a useful starting point, not a promise of nearly three carefree days without charging.
Solar performance is just as variable. A 400-watt array receiving three equivalent peak-sun hours at an illustrative 75% system yield might produce around 900 Wh in a day. Shade, clouds, roof equipment, and seasonal conditions can change that dramatically.
For longer trips, consider complementary charging from solar, a properly matched DC-DC charger, and shore power where practical. Protect circuits with correctly sized wiring and overcurrent devices, and have the system designed or inspected by a qualified professional.
Keep the galley compact but usable
A functional overland kitchen doesn’t need a restaurant-sized countertop. It needs a stable cooking surface, a secure fridge, a sink that won’t splash everything, and food storage you can reach in bad weather.
Deep drawers usually beat dark cupboards for small ingredients and utensils. A fold-out prep surface can make a tiny galley feel much bigger, while a clear route between fridge, sink, and cooking area avoids constant shuffling.
If you use any fuel-burning appliance, treat ventilation and carbon monoxide protection as essential safety requirements, not optional upgrades.
Never use a portable camping stove, charcoal grill, or generator inside the van; follow appliance-specific installation rules and use appropriate detectors.
6. Make the Van Comfortable in Real Weather
Plan airflow, insulation, and drying together
A van that feels cozy on a sunny build day can become damp and miserable after a week of cold rain. Breathing, cooking, and wet clothes introduce moisture, while metal body panels can develop condensation on cold surfaces.
A powered roof vent paired with a suitable fresh-air intake creates a useful flow path. Place openings so air moves through occupied areas instead of short-circuiting across one corner. Screens let you maintain ventilation without inviting every mosquito in the neighborhood.
Insulation helps, but it does not replace airflow. Plan thermal breaks where practical, use easy-to-clean finishes, and provide a dedicated area for drying wet gear. For cold destinations, choose a properly installed, externally vented heater suited to the climate and local rules.
Add privacy without making the cabin gloomy
Window placement is a bigger decision than it first appears. More glass brings beautiful views and daylight, but it also changes heat gain, privacy, security, and available wall space for storage.
Insulated window covers, thoughtful task lighting, and dimmable LEDs give you more control throughout the day.
Remember noise, too. Rattling latches and vibrating panels can become exhausting on gravel roads. Test-drive the van with cabinets loaded, and fix squeaks early rather than accepting them as part of van life.
7. Prototype, Test, and Leave Room for Repairs
Try the layout at full size
Before cutting expensive plywood, mark the proposed floor plan with tape and assemble cardboard mock-ups of the bed, kitchen, and benches. Then act out ordinary routines: cooking while someone passes, reaching the toilet at night, or loading a bicycle in the rain.
Measure clearance with doors open, drawers extended, and bedding in place. Digital 3D planning is helpful, but a full-size physical test catches awkward movements that screens can miss.
Take a shakedown trip before committing
Spend several nights in the van with temporary fixtures, including at least one day of lousy weather if possible. Notice what you reach for constantly, what stays unused, and where clutter naturally gathers.
After the first real trip, you’ll probaby discover that one cupboard needs a different opening direction or that a charging outlet belongs closer to the bed.
Leave removable panels around critical electrical and plumbing components, document wiring routes, and keep important spares accessible.
The ultimate adventure van interior isn’t the one that looks perfect on day one. It’s the one you can adapt, maintain, and trust thousands of kilometers later.
Great overland van design is a balancing act between freedom and practicality. The smartest layouts protect the basics first: a comfortable bed, clear circulation, safe weight distribution, accessible storage, reliable water and power, and ventilation that works in real weather.
You don’t need the biggest van or the most expensive conversion to travel well. You need an interior built around your actual habits, your travel environment, and the equipment you’ll use every day.
Start with a simple floor plan, calculate your payload and off-grid needs, then test your ideas before final installation. If you’re planning an extended expedition, sketch your ideal layout today and challenge every feature to earn its place. Future you, parked on a remote track after a long day, will be glad you did.
